In this section, we’ll continue to build on our City Guide
application. Either of the two versions of the application we now have
will do, as all of the changes we’re going to make will be confined to
the AddCityController class. In the
preceding section, we made only relatively minor changes in this class
that won’t affect our additions here.However, if you want to follow along, I’m going to return to our
original version and work on that. As we did in the preceding section,
you should work on a copy of the project, so right-click or Ctrl-click
on the folder containing the project files and select Duplicate. A
folder called CityGuide copy will be created
containing a duplicate of our project. You should probably rename the
folder to something more sensible. I suggest
CityGuide3, and renaming the project by selecting
Project→Rename from the Xcode menu
bar.
The first thing we need to do is build an interface to allow the
user to trigger the image picker. If you remember from this article, our “Add City” view was
built out of two custom table view cells. The easiest way to add this
ability is to add another table view cell.
Open the AddCityController.xib file in
Interface Builder. Drag and drop a table view cell (UITableViewCell) from the Library window into
the AddCityController.xib window. We need to resize
this cell so that it can hold a small thumbnail of our selected image,
so go to the Size Inspector (⌘-3) and change its height from the default
44 pixels to H = 83 pixels. At this point, we also need to resize the
super-size table view cell for entering the description to account for
this new cell. So, click on the description cell and go to the Size tab
of the Inspector window and change the height from H = 362 to H = 279
pixels.
Go back to the new cell and grab a label (UILabel) from the Library window and drop it
onto the Table View Cell window (if the window is not open already,
double-click on the new cell in the
AddCityController.xib window to open it). In the
Attributes Inspector (⌘-1) change the label’s text to “Add a picture:”
and then switch to the Size tab and position the label at X = 10 and Y =
28 with W = 126 and H = 21 pixels.
Next, grab an image view (UIImageView) from the
Library window and drop it onto the cell, then position it at X = 186
and Y = 7 and resize it to be W = 83 and H = 63 using the Size tab of
the Inspector window. In the Attributes tab, set the Tag attribute to
777 (this lets us easily refer to this subview from our code) and set
the view mode to Aspect Fill.
Finally, drop a round rect button (UIButton) onto the cell, and in the Attributes
tab change its type from Rounded Rect to Add Contact. The button should
now appear as a blue circle enclosing a plus sign. Position it to the
right of the UIImageView, at X = 274
and Y = 25.
After doing this, you should have something that looks a lot like
Figure 1. Set the
cell selection type to None in the Attributes tab, make sure you’ve
saved your changes to the NIB, and then open the
AddCityController.h and
AddCityController.m files in Xcode.

In the AddCityController.h interface file,
the first thing we need to do is add an IBOutlet to allow us to connect our code
to the new table view cell inside Interface Builder. We must also add an
instance variable of type UIImage
called cityPicture, which we’ll use
to hold the image passed back to us from the image picker, along with an
addPicture:
method that we’ll connect to the UIButton in the cell, allowing us to start the
image picker. Add the lines shown in bold to the file:
#import <UIKit/UIKit.h>

@interface AddCityController : UIViewController
  <UITableViewDataSource, UITableViewDelegate> {
    IBOutlet UITableView *tableView;
    IBOutlet UITableViewCell *nameCell;
    IBOutlet UITableViewCell *pictureCell;
    IBOutlet UITableViewCell *descriptionCell;

    UIImage *cityPicture;
}

- (void)saveCity:(id)sender;
- (IBAction)addPicture:(id)sender;

@end
Before implementing the code to go with this interface, we need to
quickly go back into Interface Builder and make those two connections.
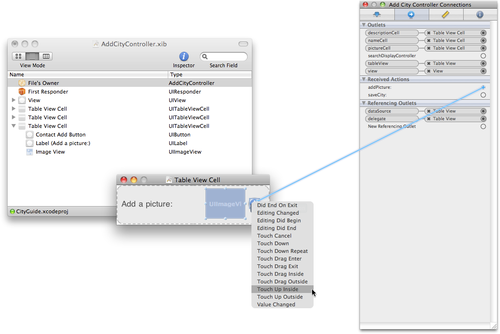
Open the AddCityController.xib file and click on
File’s Owner, then use the Connections Inspector (⌘-2) to connect the
pictureCell outlet to your new
UITableViewCell. Next, click on the
addPicture:
received action and connect it to the
UIButton in your table view cell; see
Figure 2. When you
release the mouse button you’ll be presented with a pop-up menu of
possible events the button can generate. We want just
a simple button click, so select the Touch Up Inside event.
We now need to save this file, and then go back into Xcode to
finish our implementation. In the
AddCityController.m implementation file, first we
have to provide a default image for the UIImage in the cell (otherwise, it will appear
blank). We can do this inside the viewDidLoad: method by adding this line ):
cityPicture = [UIImage imageNamed:@"QuestionMark.jpg"];
We also have to make some changes to the table view delegate and
data source methods (in the AddCityController.m
implementation file) to take account of the new cell. First we need to
change the number of rows returned by the tableView:numberOfRowsInSection: method from
two to three. Make the change shown in bold:
 - (NSInteger)tableView:(UITableView *)tv
     numberOfRowsInSection:(NSInteger)section
{
    return 3;
}
Now we need to modify the tableView:cellForRowAtIndexPath: method to
return the extra cell in the correct position in our table view. Make
the changes shown in bold:
- (UITableViewCell *)tableView:(UITableView *)tv
    cellForRowAtIndexPath:(NSIndexPath *)indexPath {
    UITableViewCell *cell = nil;
    if( indexPath.row == 0 ) {
        cell = nameCell;
    } else if ( indexPath.row == 1 ) {
UIImageView *pictureView = (UIImageView *)[pictureCell viewWithTag:777];
pictureView.image = cityPicture;
cell = pictureCell;
    } else {
        cell = descriptionCell;
    }
    return cell;

}
We also need to change the tableView:heightForRowAtIndexPath: method to
take account of the new cell. Make
the changes shown in bold:- (CGFloat)tableView:(UITableView *)tv
heightForRowAtIndexPath:(NSIndexPath *)indexPath
{
CGFloat height;
if( indexPath.row == 0 ) {
height = 44;
} else if( indexPath.row == 1 ) {
height = 83;
} else {
height = 279;
}
return height;
}
We also need to remember to release the pictureCell variables in the dealloc: method. We don’t have to release the
cityPicture variable because it will
be part of the autorelease pool. Add the following to the
dealloc: method:
[pictureCell release];
Finally, we need to add a placeholder implementation (after the
instance methods pragma mark) for our addPicture: method, which we’ll fill in
later:
- (IBAction)addPicture:(id)sender {
    NSLog(@"addPicture: called.");
}
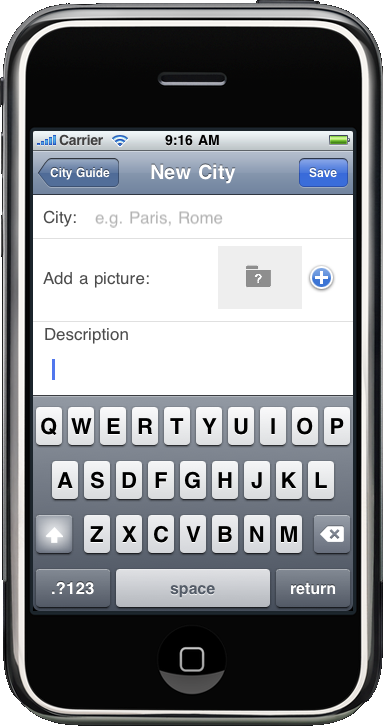
We’re done, at least for now. Click Build and Run in the Xcode
toolbar to compile and run the application in iPhone Simulator. Once the
application has started, tap the Edit button in the navigation bar and
click Add New City (if you chose to modify the second version of the
guide, click the Add button). Figure 3 shows the new
view.
Now we have an interface to trigger the image picker for us, so
let’s implement the code to do that. First we need to add a UIImagePickerController
variable to the AddCityController.h interface file,
along with a UIImage variable to hold
the image returned by the image picker. We also need to declare the
class to be a delegate. Make the changes shown in bold:
@interface AddCityController : UIViewController
  <UITableViewDataSource, UITableViewDelegate,
    UIImagePickerControllerDelegate, UINavigationControllerDelegate> {
    IBOutlet UITableView *tableView;
    IBOutlet UITableViewCell *nameCell;
    IBOutlet UITableViewCell *pictureCell;
    IBOutlet UITableViewCell *descriptionCell;

    UIImage *cityPicture;
    UIImagePickerController *pickerController;
}

- (void)saveCity:(id)sender;
- (IBAction)addPicture:(id)sender;

@end
In the AddCityController.m implementation
file, we need to modify the viewDidLoad: method to initialize our UIImagePickerController. Make the changes
shown in bold:
- (void)viewDidLoad {
    self.title = @"New City";
    self.navigationItem.rightBarButtonItem = [[UIBarButtonItem alloc]
      initWithBarButtonSystemItem:UIBarButtonSystemItemSave
      target:self action:@selector(saveCity:)];
    cityPicture = [UIImage imageNamed:@"QuestionMark.jpg"];

    pickerController = [[UIImagePickerController alloc] init];
pickerController.allowsImageEditing = NO;
pickerController.delegate = self;
pickerController.sourceType =
UIImagePickerControllerSourceTypeSavedPhotosAlbum;
}
We also need to implement the addPicture: method, the method called when we
tap the button in our interface. This method simply starts the image
picker interface, presenting it as a modal view controller. Replace the
placeholder addPicture: method you
added to the AddCityController.m file as part of
the instance methods pragma section with the following:
- (IBAction)addPicture:(id)sender {
    [self presentModalViewController:pickerController animated:YES];
}
Next, we need to implement the delegate method that will tell our
code the user has finished with the picker interface, the imagePickerController:didFinishPickingMediaWithInfo:
method. Add the following to AddCityController.m
inside the UIImagePickerController
method’s pragma section:
- (void)imagePickerController:(UIImagePickerController *)picker
    didFinishPickingMediaWithInfo:(NSDictionary *)info
{
    [self dismissModalViewControllerAnimated:YES];
    cityPicture = [info objectForKey:@"UIImagePickerControllerOriginalImage"];

    UIImageView *pictureView = (UIImageView *)[pictureCell viewWithTag:777];
    pictureView.image = cityPicture;
    [tableView reloadData];

}
Finally, in the saveCity:
method, we need to add a line just before we add the newCity to the cities array. Add the line shown in
bold:newCity.cityPicture = nil;
newCity.cityPicture = cityPicture;
[cities addObject:newCity];
This will take our new picture and serialize it into the data
model for our application.
It’s time to test our application. Make sure you’ve saved your
changes and click Build and Run.
Note:
If you test the application in iPhone Simulator, you’ll notice
that there are no images in the Saved Photos folder. There is a way around this problem.
In the simulator, tap the Safari icon and drag and drop a picture from
your computer (you can drag it from the Finder or iPhoto) into the
browser. You’ll notice that the URL bar displays the file path to the
image. Click and hold down the cursor over the image and a dialog will
appear allowing you to save the image to the Saved Photos
folder.
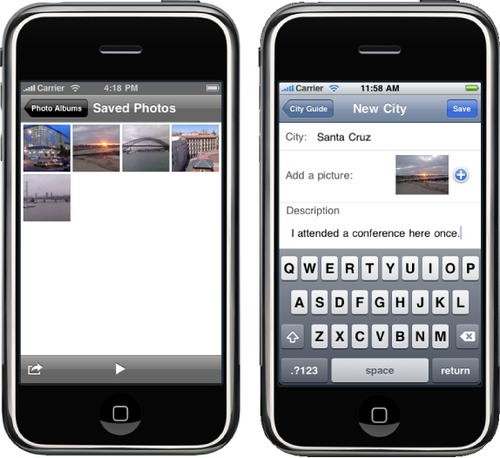
Once the application has started, tap the Edit button in the
navigation bar and go to the New City view. Tapping the blue button will
open the image picker, as shown in Figure 4, and allow you to
select an image. Once you’ve done this, the image picker will be
dismissed and you’ll return to the New City interface.
Is everything working? Not exactly; depending on how you tested
the interface you may have noticed the problem. Currently, if you enter
text in the City field and then click on the “Add a picture” button
before clicking on the Description field, the text in the City field
will be lost when you return from the image picker. However, if you
enter text in the City field and then enter text in
(or just click on) the Description field, the text will still be there
when you return from the image picker. Any text entered in the Description field will remain in any
case.
This is actually quite a subtle bug and is a result of the
different ways in which a UITextField
and UITextView interact as first
responders. To explain this without getting
into too much detail, the first responder is the object in the
application that is the current recipient of any UI events (such as a
touch). The UIWindow class sends
events to the registered first responder, giving it the first chance to
handle the event. If it fails to do so, the event will be passed to the
next object.
By default, the UITextField
doesn’t commit any changes to its text until it is no longer the first
responder, which is where the problem comes from. While we could change
this behavior through the UITextFieldDelegate protocol, there is a
simpler fix. Add the lines shown in bold to the addPicture: method:
- (IBAction)addPicture:(id)sender {
    UITextField *nameEntry = (UITextField *)[nameCell viewWithTag:777];
					    [nameEntry resignFirstResponder];

    [self presentModalViewController:pickerController animated:YES];
}
With this change, we force the UITextField to resign as first responder
before we open the image picker. This means that when the image picker
is dismissed, the text we entered before opening it will remain when we
are done.
Save your changes, and click on the Build and Run button in the
Xcode toolbar. When the application starts up, return to the New City
view and confirm that this simple change fixes the bug.